利用Python和API函数创建几何模型实例【转发】
2017-07-03 by:CAE仿真在线 来源:互联网
利用Python、Workbench的API函数以及xml进行Workbench二次开发的一个比较完整的例子,文中代码来自于ANSYS帮助文档,笔者对代码做了一些细致的解释。
正文
以下是Workbench的DM中一个extension的Python代码,代码的主要功能是针对一个已经存在的模型,在此基础上画圆、拉伸、做add体操作,以及一些显示。
#导入units和math模块
import units
import math
#定义函数createMyFeature,创建用户对象geometry,名称显示在Tree Outline。
def createMyFeature(feature):
#利用CreateFeature函数创建用户对象;
#函数CreateFeature的变量是字符串,返回用户对象;
#函数CreateFeature入口是ExtAPI.
ExtAPI.CreateFeature("MyFeature")
#定义函数vectorProduct,创建矢量
def vectorProduct(v1, v2):
#返回[y1*z2-z1*y2,-x1*z2+z1*x2,x1*y2-y1*x2]
return [v1[1]*v2[2]-v1[2]*v2[1], -v1[0]*v2[2]+v1[2]*v2[0], v1[0]*v2[1]-v1[1]*v2[0]]
#定义标量函数scalarProduct,创建标量
def scalarProduct(v1, v2):
#返回 x1*x2+y1*y2+z1*z2
return v1[0]*v2[0]+v1[1]*v2[1]+v1[2]*v2[2]
#定义函数,求平方根
def norm(v):
#利用math模块的sqrt函数
return math.sqrt(scalarProduct(v,v))
#定义函数生成模型
def generateMyFeature(feature,function):
#定义变量,赋值为对象的长度,这个长度值是在xml里面定义的;
#xml定义好界面,会有"Length“项,取值即可。
length = feature.Properties["Length"].Value
#单位转换
length = units.ConvertUnit(length, ExtAPI.DataModel.CurrentUnitFromQuantityName("Length"), "m")
#界面所选择的面作为faces的取值,这个也是xml定义的。
faces = feature.Properties["Face"].Value.Entities
#定义空列表
bodies = []
#获取GeometryBuilder入口
builder = ExtAPI.DataModel.GeometryBuilder
#通过循环面
for face in faces:
#获取面的中心,是三个数(x,y,z)组成的数组
centroid = face.Centroid
#由于需要自动判别某个面的法向等,所以计算过程看起来比较复杂
#定义uv数组,含有两个量,可以理解为针对某个面自动确定的x和y坐标,再结合面的中心点;
#可以在这个面的中心建立一个局部坐标系,利用函数ParamAtPoint
uv = face.ParamAtPoint(centroid)
#获取面的法向向量,应该是通过面的中心点一级uv数组三个数一起算出来的。
normal = face.NormalAtParam(uv[0], uv[1])
#定义半径
radius = math.sqrt(face.Area/(math.pi*2))
#初始化向量xdir
xdir = [1., 0., 0.]
#调用函数vectorProduct计算
vector = vectorProduct(xdir, normal)
if norm(vector)<1.e-12:
xdir = [0., 1., 1.]
s = scalarProduct(xdir, normal)
xdir = [xdir[0]-s*normal[0],xdir[1]-s*normal[1],xdir[2]-s*normal[2]]
n = norm(xdir)
xdir[0] /= n
xdir[1] /= n
xdir[2] /= n
#中间这一段代码确实晦涩难懂,其用途就是计算圆弧的主向量。
#之后通过CreateArc函数创建一段圆弧
arc_generator = builder.Primitives.Wire.CreateArc(radius, centroid, xdir, normal)
#利用Generate()函数生成圆弧
arc_generated = arc_generator.Generate()
#利用WireToSheetBody函数将圆弧转换成面
disc_generator = builder.Operations.Tools.WireToSheetBody(arc_generated)
#单位化向量
normal[0] *= -1
normal[1] *= -1
normal[2] *= -1
#利用CreateExtrudeOperation函数进行拉伸操作
extrude = builder.Operations.CreateExtrudeOperation(normal,length)
#拉伸的对象是创建的面【第一个对象】
cylinder_generator = extrude.ApplyTo(disc_generator)[0]
#存放在列表中
bodies.Add(cylinder_generator)
#返回值
feature.Bodies = bodies
#类型为Add
feature.MaterialType = MaterialTypeEnum.Add
return True
#定义函数afterGenerateMyFeature,当<ongenerate>完成后自动执行该函数
#该函数主要完成两个功能,一是显示出最小body的体积
#二是将所用的edge放在一个集合里面
def afterGenerateMyFeature(feature):
edges = []
#定义一个系统内的最大值,用于后续的比较
minimum_volume = System.Double.MaxValue
#通过循环找出最小体积
for body in feature.Bodies:
body_volume = 0
if str(body.BodyType) == "GeoBodySolid":
body_volume = body.Volume
if body_volume <= minimum_volume:
minimum_volume = body_volume
#将所用的edge放在edges列表里面
for edge in body.Edges:
edges.Add(edge)
else:
ExtAPI.Log.WriteMessage("Part: "+body.Name)
#feature的显示值
feature.Properties["Minimum Volume"].Value = minimum_volume
#创建集合
ExtAPI.SelectionManager.NewSelection(edges)
named_selection = ExtAPI.DataModel.FeatureManager.CreateNamedSelection()
ExtAPI.SelectionManager.ClearSelection()
该Python代码并不能直接在DM中使用,还需要接触XML编写界面程序,界面程序可以将上面Python代码中的函数进行有效绑定。
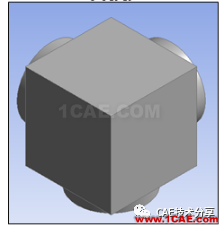
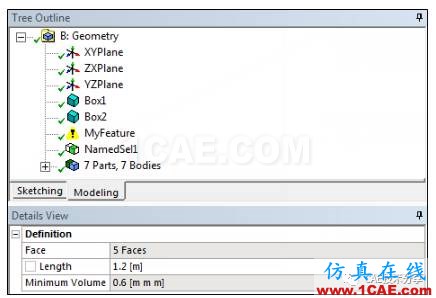
最后能够生成的模型以及在Workbench的DM中存在的形式分别如下图所示。

图1

图2
对应的xml代码为:
<! 定义extension的版本号为1,名称为GeometryFeature>
<extension version="1" name="GeometryFeature">
<! 指定该extension所执行的python代码名称为main.py>
<script src="main.py" />
<! 说明该extension应用在DesignModeler模块>
<interface context="DesignModeler">
<! 定义该extension的背景,文件名称为image>
<images>images</images>
<! 定义一个工具条,名称为ACTtoolbar,显示名称为ACTtoolbar>
<! 定义入口名称为MyFeature,使用的标志为construction>
<! 调用的函数为createMyFeature>
<toolbar name="ACTtoolbar" caption="ACTtoolbar">
<entry name="MyFeature" icon="construction">
<callbacks>
<onclick>createMyFeature</onclick>
</callbacks>
</entry>
</toolbar>
</interface>
<! simdata标签下定义对模型的定义>
<! 调用函数generateMyFeature和afterGenerateMyFeature>
<simdata context="DesignModeler">
<geometry name="MyFeature" caption="MyFeature" icon="construction" version="1">
<callbacks>
<ongenerate>generateMyFeature</ongenerate>
<onaftergenerate>afterGenerateMyFeature</onaftergenerate>
</callbacks>
<! 定义属性,有一个叫做“Face”栏目,显示名称为“Face”,采用滚动条控制>
<property name="Face" caption="Face" control="scoping">
<! 定义选择类型为面>
<attibutes selection_filter="face"/>
</property>
<! 定义属性,名称为length,显示Length,数据类型为float,单位为长度单位,默认值为1.2>
<property name="Length" caption="Length" control="float" unit="Length" default="1.2 [m]"></property>
<! 定义属性,最小体积Minimum Volume,数据类型为float,单位为体积单位>
<property name="Minimum Volume" caption="Minimum Volume" control="float" unit="Volume" >
<attributes readonlyaftergenerate="true" />
</property>
</geometry>
</simdata>
</extension>
Xml文件与py文件相互之间实现数据传递,完成整个extension的建立。
转自公众号:CAE技术分享
相关标签搜索:利用Python和API函数创建几何模型实例【转发】 Ansys有限元培训 Ansys workbench培训 ansys视频教程 ansys workbench教程 ansys APDL经典教程 ansys资料下载 ansys技术咨询 ansys基础知识 ansys代做 Fluent、CFX流体分析 HFSS电磁分析 Abaqus培训


